Machais Causeway-Basic Shape
Last night I started work on the Machais causeway. This causeway takes up about five actual feet of space on my layout and will eventually become one of the layout's signiture scenes. The causeway carries U.S. route 1 and the Calais branch across an inlet of the Machais River. It is a very recognizable location in real life even though the tracks have been removed and replaced by a trail. The track is very close to the road and probably is on a right of way that is only 15 feet wide or so between the road and the water. The road goes up a hill on both sides of the causeway, which made things more difficult to model. However, it is such a recognizable scene on the Calais branch that I had to model it.
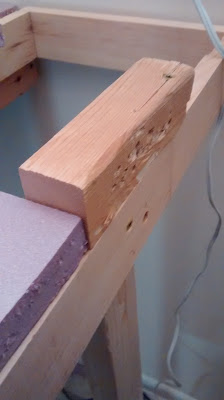
To model this feature, I first took a roughly 4 feet long by 6 inch wide piece of foam board to construct the part of the road that climbs up a hill. On my layout, I model part of the road leading towards Calais, and I had to find a way to make the road slope upwards. To do this, I attached a small scrap of wood that is about one and a half inches tall to the edge of the benchwork away from the layout. While I was attaching it, the block split on the top, but it didn't really affect attaching it to the rest of the benchwork, so I'm not really worried about that. Also, it does not really support anything that will have any weight on it.
To model this feature, I first took a roughly 4 feet long by 6 inch wide piece of foam board to construct the part of the road that climbs up a hill. On my layout, I model part of the road leading towards Calais, and I had to find a way to make the road slope upwards. To do this, I attached a small scrap of wood that is about one and a half inches tall to the edge of the benchwork away from the layout. While I was attaching it, the block split on the top, but it didn't really affect attaching it to the rest of the benchwork, so I'm not really worried about that. Also, it does not really support anything that will have any weight on it.
I then placed a good amount of wood glue on the back of the foam board where it would be flat along the rest of the foam. I also put wood glue on the wood support piece at the elevated end of the road. I find that plain wood glue works very well on foam board, at least as well as any other adhesive, and results in a very strong bond.
I then put the foam in place and made sure it was glued down to a spot that resulted in the slope of the road that I wanted. I then placed an old railroad latern to hold the foam down while it dried. It dries completely and solidly in about a day.
This is how the road section that slopes up looked at the end of work on that for the night. The foam surrounding the road will later be built up into a hill. The track will cross the road and start to follow the river in the foreground, just in front of the joint between the two foam sheets.


Comments
Post a Comment