Posts

Showing posts from October, 2016

Penobscot Street Spur - Concept Sketch

Image
A few days ago, I made a sketch of how I want my Penobscot Street Spur layout to fit into the corner of a room that I have planned for it to go in. I also sketched out some of the planned scenic elements of the layout, as well as the buildings that I have planned for the layout. The longer section of the layout will be built on top of shelving, and will have an additional shelf built above it. The shelf above will have lighting for the layout attached to the bottom of it, and will also serve to hold the scratchbuilt structures that I have that do not fit on this layout. I am planning on building the benchwork as 'floating' benchwork, as described by Lance Mindheim in a recent issue of Model Railroader. This should result in the layout looking cleaner and more presentable, a good thing as it will be located in a corner of a room. I also sketched in the approximate sizes and rooflines of the structures that I am planning to include on this layout. The scribbled vertica

Wordless Wednesday #7

Image

Penobscot St. Spur - Layout Mockup

Image
A few days ago, I made a mock up of my planned Penobscot Street Spur layout to test how the vertical elememts of the track plan, such as the buildings and hills, would look. I made the mockup from a scrap of cardboard and some masking tape. The masking tape on the mockup represents roads, while the small pieces of cardboard represent buildings. While it's not very pretty or well done, I think that the mockup helps show that the buildings and the hill covering the enterance to staging work together on the layout. From the mockup, I think that the number of buildings I designed into the layout are enough to give the impression that the layoit depicts an active industrial area, while still giving the layout space to breeth, so to speak. At the moment, this is about all the active model railroading that I can do, since my workbench is currently packed away. I'm hoping, though, that I can return to building things soon, but until then, not much will be happening on this blo

Wordless Wednesday #6

Image

Penobscot St. Spur - Trackplan

Image
Here is the track plan that I designed for the Penobscot St. spur. Click on the image to make it larger The layout is in HO, with 22 inch minimum radius and no. 4 turmouts, for now. Shaded in areas are roads. On the trackplan, Maine Central's Calais/Bucksport branch runs across the top of the plan, along the three foot six inch long wall. In the corner, the track will disappear into a clump of trees. In reality, the track there would go onto a large bridge to cross the Penobscot River into Bangor. After the track comes out of the clump of trees, the line crosses a street and then goes into a short cut. The switch to the Penobscot Street Spur is located in the cut. The Calais branch than passes under a road overpass, which is located in the upper right of the plan. The overpass actually does exist in real life, and is the perfect way to disguise the fact that the layout pretty much ends after the track passes beneath the bridge. I am planning to have a removable staging t

Great Scale Model Train Show

I am mostly posting this as a reminder to myself. I am planning on attending the Great Scale Model Train Show in Timonium, Maryland, on October 29th and 30th. I have never been to this event before, but it sounds like it should be very good. Quite frankly, how can you go wrong with 3 and a half acres of train show? The link to the train show's website is http://www.gsmts.com/index.htm.

Maine Central's Penobscot Street Spur

Image
For reasons beyond my control, I no longer have the space to work on a medium sized layout like I had planned. Thus, my layout building efforts will probably be contained to a corner of my bedroom. I have decided, then to design and build a small switching layout. Besides the space issues, I decided to work on a switching layout so that I would have a better chance of finishing a layout. None of my previous layouts have progressed passed the stage of tracklaying. I think that perhaps a smaller switching layout will make it so that I can finally get scenery finished. I also want to be able to try things like attaching a backdrop to my layout.  So I got out my copy of Maine Central in Color Volume 3, and started to look for a suitable prototype to model on a small switching layout. I had three criteria for a prototype for the layout: first, it had to be of the Maine Central in the 50s, second, it had to be in Maine (meaning no mountain division), and it had to be small enough that

Wordless Wednesday #5

Image

Terrain at Norrigewock

Image
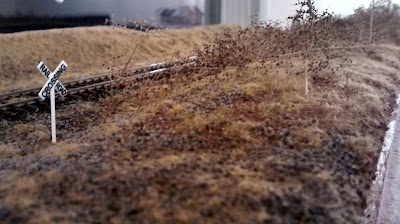
Last evening, I added some terrain to the area around Norridgewock yard on my layout. I added a small rise in front of the tracks, following topographic maps of the area. To add the rise, I first attached some scraps of one inch thick foam insulation board that I had on hand. The foam was then attached with screws. I then cut the foam to eliminate the sharp corner in the center of the image and to make the foam parallel the track. I then shaped the foam with a rasp, shaping the foam to get a realistic variety of contuors I saved the foam shavings generated by shaping the foam. I put the shavings in a mall plastic container and then used the shavings to fill in the gaps between the sheets of foam that I used to make the rise. A view of the finished rise by the Maine Central Tracks in Norridgewock. I got more work on the rise done at the same time, and I will post more about that work soon.

Siding Track

Image
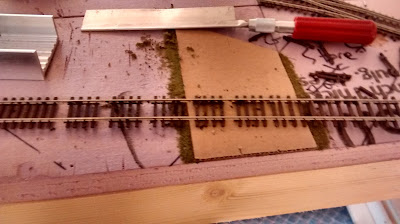
As I have been working on track for my new layout depicting Norridgewock, I have modified atlas code 83 flextrack to better represent siding track. The technique I used os hardly very new or original. To modify the track,  I cut every tie apart from the other ties with a small saw, keeping the ties attached to the rails. I then removed every fifth tie from the peice of flextrack. The resulting track looks much more realistic for lightly layed track. I think that this technoque is worth the effort, especially for a smaller layout. A picture of the track in the process of being modified. From left to right, there is a section of original track, track with every fifth tie removed, and track where the ties have been spread out. At the top of the image is the saw that I used to cut the ties. A length of the modified track is shown once installed on the layout. The modified track is in the center of the image.

Wordless Wednesday #4

Image

First Trains at Norridgewock

Image
Over the past few nights, My layout has changed quite a bit. It now depicts the Maine Central Railroad in Norridgewock, Maine. I will explain this in a later post, probably over the weekend. For now, I will just dhare some poctures of the first HW-2 (Bingham to Waterville local freight) through my version of Norridgewock. HW-2 approaches heads through the limited trackage at Norridgewock. Looking at HW-2 from the driveway of a house near the tracks.   HW-2 heads through Norridgewock. An overview of Norridgewock with HW-2 running through it. HW-2 in Norridgewock. A view of HW-2 from a house near the tracks. HW-2 departs Norridgewock and heads south to Waterville.

Accurail Freightcars

Image
After finishing construction of the Candian Pacific boxcar that I wrote about yesterday, I realized that I had built twenty Accurail freight car kits. I put them all out on my layout and photographed them. I rhought that I would share the pictures with you here. An overview of the train. Another overview of the train. A low level shot that I took. Despite the obvious lack of ballast, I think that this photo looks quite realistic.

Canadian Pacific #254306

Image
This afternoon, I assembled an accurail kit for a 40 foot steel boxcar that os decorated for Canadian Pacific. I assembled following the directions and did not make any modifications to it. It will look good on CP freights through Mattawamkeag and in interchange service. Candian Pacific #254306