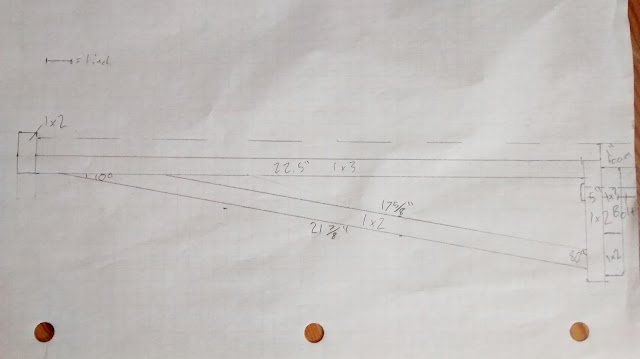
Posts

Showing posts with the label Layout Design

A New Layout?

Image
This does not, in any way, mean that I've abandoned the North Toronto Team Tracks layout. However, I've run into a bit of a problem as I can't move forward on construction for the layout until I can purchase more styrene strip in order to make curbs for the streets on the layout. Until then, though, I plan to work on a project that is feasible with materials I have on hand. Recently, I've been looking through the old posts of Chris Mears' excellent  Prince Street  blog. While looking through his blog, I came across his ideas for a model railway with tightly controlled viewpoints, showing only small scenes within a very large overall fascia. My explanation doesn't do the idea justice, but  here is the link to his original post on the concept.  At the time, I was quite intrigued by the idea, and as I had no layout at the time, I considered building a version of it. However, I was unable to come with a viable prototype for such a layout, and I eventually moved on...

Staging Plans

Image
Quite a bit of progress has occurred on my model railway over the past few days, including the installation of all track on the primary two modules of the layout, though I have been remiss about posting about this progress. However, the next major project for the layout is the staging module. This is necessary before I proceed any further, mostly as I can't operate the layout until the staging module is attached as it serves as a yard lead/tail track. While the main part of the layout is now semi-permanently installed, the staging module has to be detached from the layout after each operating session, as it blocks the door to the room. The idea for this staging module comes from Rick De Candido's Fillmore Avenue Roundhouse blog. Specifically, I plan to use the idea for the tray assembly from his Staging Cassette Mk1  post to form the main part of the staging area. I also plan to use cassettes of some sort to finish of the staging area. I did, however, make a few modificati...

An Idea - CPR North Toronto Team Tracks

Image
After quite a while thinking over numerous aspects of the hobby, and spending a while on layout design, both in terms of type of layout and location to be modeled, I've finally arrived at a plan that I think will work and serve my purposes for a layout quite well. This location modeled, the North Toronto CP Rail team tracks, will allow me to have some limited operation and an interesting layout, while the layout design is practical to fit in what space I have, thanks to the  Model Railroad to Go  concept. Over the last week or so, I've drawn up plans of the prototype location in google maps, made a track plan on my online prototype map, and most recently, I've drafted a paper plan for the actual layout as I plan to construct it. Before I elaborate on the aforementioned layout plan, there have been some rather noticeable changes made to this blog. I had grown somewhat frustrated with the typical blogger layout that this blog has used for over a year now, which I've fou...

An Idea?

Perhaps. Recently, I have been trying to come up with a way to have a decent layout despite the fact that I have essentially no space for a permanent layout in a traditional sense. For reasons I've explained previously, I do not have the space for a traditional shelf layout or a module along Free-mo lines. At the same time, I've also had somewhat of a difficult time coming up with practical ideas for a location to model. Part of this problem is a result of my desire to model a specific prototype location - thus, I've closed off the easy way out of this problem by freelancing a small area to fit a small space. In the past few weeks, however, I think I may have come to some sort of solution and compromise that would allow me to build a layout that would fit my needs. First, I think I've found a good solution to my space problems, thanks to Rick De Candido and his  Fillmore Avenue Roundhouse  blog. A short time ago, he shared a layout idea called the  Model Rai...

Lac Frontiere P.Q. - Layout Design

Image
Research for my next layout based on Lac Frontiere, P.Q.has proceeded much more quickly than I expected. Quite a bit of time this weekend was spent on attempting to figure out the track arrangement in Lac Frontiere, and despite the fact that I'm not completely sure of the track arrangements, there seems to be enough information to start moving forward to layout design for this layout.  As far as I can tell, most of the operation and railway facilities in Lac Frontiere were concentrated in an area that was about three-tenths of a mile long and around 300 feet at its widest point. The railway facilities appear to be across the main road (named Rue Principale, according to Google Maps) form the center of town in Lac Frontiere, such as it is. This fairly small area should make designing a layout around Lac Frontiere less difficult, as less compression of the railway facilities will be necessary. Also, along Rue Principale near the station area there are an assortment of older houses...

Lac Frontiere, P.Q.

I've finally come to a decision about what location to model. This doesn't necessarily mean that I have any concrete idea as to a layout plan - in fact, I have no particular ideas as regards layout design for this. Nonetheless, it's good to have finally concluded where to model: Lac Frontiere, P.Q. (I use P.Q. to abbreviate Quebec rather than QC). Lac Frontiere, for those who do no know, was the end of a Quebec central railway branch and is located right along the border with Maine, near the headwaters of the St. John River, and next to Lac Frontiere. You can (hopefully) see a map  here. Lac Frontiere was at the end of a branchline of the  Quebec Central Railway , which was later bought by  CP Rail  (Canadian Pacific at the time). By the mid 1970s, my era of interest for the layout, the QC was operated with CP Rail locomotives and rolling stock, which fits well with my interest in CP Rail. Lac Frontiere was never intended to be the terminus of the line - rather, th...

Layout Design Thoughts - Part 2

In my last post of any substance, I wrote about my thoughts to rebuild my previous layout based on Norway Maine. While I still think that that is the most likely prototype for my next layout, even if that's only because I have a lack of other ideas. Grand Trunk New England lines seems like that it would be the best choice overall for a layout, but I'm still rather tempted to model the Bangor and Aroostook instead. On the whole, I'm rather disinclined to devote a large amount of time and resources, as well as a fair amount of space, to a layout idea that I'm not sure about. I did, after all, disassemble the Norway layout the first time, and at the time I decided to move on to something else, which makes me doubt that Norway is really the right prototype for my next layout. At any rate, nothing that I build will probably survive very long, as I tend to not get very far into building a layout before I disassemble it. With all these factors, it's rather hard to actually...

Norway Revisited?

Longtime readers of this blog (are there any?) will know that I at one point had a layout based on the Grand Trunk New England Lines (GTNE) branch to Norway, Maine. This layout was built in modules but was disassembled when I moved in October. Recently, I've been thinking about layout design, and I've been trying to decide on a new layout to build. Yesterday, when I was looking through my phone at some of my older photos, I came across some photos of my layout based on Norway. Looking at them, I decided that I had a fairly good layout in that, so I've decided to revisit that layout and that prototype as a possible prototype for my next layout. You can find the original post on the track plan and layout design for my previous layout  here.  Or, you can access most posts on the topic of the GTNE by clicking on the Grand Trunk New England Lines category on the categories sidebar, though that may not get you to that particular post as it may have been posted before I added ca...

Layout Design Thoughts

Image
I know that I said that this post would not be as wordy as the last post, but it will nearly be as wordy. Hopefully it will be readable and a few people will read through it. On my last post, I recieved a comment suggesting that I build modules based on my own standards rather than free-mo standards. This, I think, is a very good idea, and I will probably use this idea for the layout that I am planning. I guess that this idea should have been a fairly obvious one as I have been looking at various modular designs, but I somehow got stuck limiting myself only to free-mo, and I was unable to think abput any other options than freemo modules or a shelf layout. I think that a modular approach with standards set by myself would proabably be the best available option for what I'm generally planning at the moment. While I had previously thought that freemo would be the only modular option, I started having doubts that that approach to model railroading would work for me while writing t...

General Update

I haven't been very good at posting lately, and I don't really have any reason not to. I have been fairly active with model rqilroading in the last few weeks, but I haven't felt inclined to post much, and I'm not quite sure why. At any rate, I'll use this post to breifly describe some of the model railroading related things that I've done recently. I scratchbuilt two structures recently. One was a model of a Canadian Pacific statation closely followinng the station in Grand Falls, New Brunswick. I also scratchbuilt a feedmill that was not based of any particular prototype. I will cover these buildings more extensively in separate posts soon.  I also recently acquired a new locomotive. This locomotive is the Bachmann model of CP Rail alco S2 number 7020. I acquired this locomotive for a planned shelf layout based on CP Rail in the late 1970s, probably set in the maratime provinces. I built a small ( ten inches by 54 inches) scenery test layout. I liked how ...

Penobscot Street Spur - Concept Sketch

Image
A few days ago, I made a sketch of how I want my Penobscot Street Spur layout to fit into the corner of a room that I have planned for it to go in. I also sketched out some of the planned scenic elements of the layout, as well as the buildings that I have planned for the layout. The longer section of the layout will be built on top of shelving, and will have an additional shelf built above it. The shelf above will have lighting for the layout attached to the bottom of it, and will also serve to hold the scratchbuilt structures that I have that do not fit on this layout. I am planning on building the benchwork as 'floating' benchwork, as described by Lance Mindheim in a recent issue of Model Railroader. This should result in the layout looking cleaner and more presentable, a good thing as it will be located in a corner of a room. I also sketched in the approximate sizes and rooflines of the structures that I am planning to include on this layout. The scribbled vertica...

Penobscot St. Spur - Layout Mockup

Image
A few days ago, I made a mock up of my planned Penobscot Street Spur layout to test how the vertical elememts of the track plan, such as the buildings and hills, would look. I made the mockup from a scrap of cardboard and some masking tape. The masking tape on the mockup represents roads, while the small pieces of cardboard represent buildings. While it's not very pretty or well done, I think that the mockup helps show that the buildings and the hill covering the enterance to staging work together on the layout. From the mockup, I think that the number of buildings I designed into the layout are enough to give the impression that the layoit depicts an active industrial area, while still giving the layout space to breeth, so to speak. At the moment, this is about all the active model railroading that I can do, since my workbench is currently packed away. I'm hoping, though, that I can return to building things soon, but until then, not much will be happening on this blo...

Penobscot St. Spur - Trackplan

Image
Here is the track plan that I designed for the Penobscot St. spur. Click on the image to make it larger The layout is in HO, with 22 inch minimum radius and no. 4 turmouts, for now. Shaded in areas are roads. On the trackplan, Maine Central's Calais/Bucksport branch runs across the top of the plan, along the three foot six inch long wall. In the corner, the track will disappear into a clump of trees. In reality, the track there would go onto a large bridge to cross the Penobscot River into Bangor. After the track comes out of the clump of trees, the line crosses a street and then goes into a short cut. The switch to the Penobscot Street Spur is located in the cut. The Calais branch than passes under a road overpass, which is located in the upper right of the plan. The overpass actually does exist in real life, and is the perfect way to disguise the fact that the layout pretty much ends after the track passes beneath the bridge. I am planning to have a removable staging t...

Maine Central's Penobscot Street Spur

Image
For reasons beyond my control, I no longer have the space to work on a medium sized layout like I had planned. Thus, my layout building efforts will probably be contained to a corner of my bedroom. I have decided, then to design and build a small switching layout. Besides the space issues, I decided to work on a switching layout so that I would have a better chance of finishing a layout. None of my previous layouts have progressed passed the stage of tracklaying. I think that perhaps a smaller switching layout will make it so that I can finally get scenery finished. I also want to be able to try things like attaching a backdrop to my layout.  So I got out my copy of Maine Central in Color Volume 3, and started to look for a suitable prototype to model on a small switching layout. I had three criteria for a prototype for the layout: first, it had to be of the Maine Central in the 50s, second, it had to be in Maine (meaning no mountain division), and it had to be small enough ...

Track Plan

Image
Here is the track plan for my layout. (Click on the image to enlarge it.) Each square represents nine square inches, while a distance of four squares represents a foot. The layout size is approximately nine by eight feet. A staging area will be added later, either in the form of a sector plate or a two track yard. Minimum radius is thirty inches on the mainline, and there are no grades. The two dotted lines that cross the layout represent the joints between the modules. The town module is six feet long, the two outer sides of the corner module are each three feet long, and the third, countryside, module is five feet long.  To anyone reading this who lives in Canada, happy Canada Day!

Why Norway, Maine?

Why am I modelling the Grand Trunk's Norway, Maine branch? This is probably the most important question as regards my layout. Norway was the smallest branch line terminal on the Grand Trunk New England Lines, and perhaps even in the entire state of Maine. Its yard (if it can be called that) and terminal area contained only five switches, as far as I know. This worked well for me as I wanted to model a small branch line terminal,. I also wanted to build my layout in a small space, and make it somewhat portable, as well. In addition, I already had a six foot long by thirty inch wide module constructed. As I played around with rough designs for Norway, it became apparent that the yard arrangement at Norway would fit on the module very easily. This was appealing as it did not require the construction of new benchwork for the town. As well as having a very small amount of track, the terminal at Norway was located in a very small area. The Norway terminal was located in a roughly...

Why Grand Trunk New England Lines?

Please excuse the wordy nature of this post, but I think it is necessary to explain the concept and ideas behind my layout. First, I will explain a bit of historical background of the Grand Trunk New England Lines (GTNE), which seem to not be very well known. The Grand Trunk New England Lines ran between Portland, Maine, a mid sized port city on the Atlantic coast, and Montreal, P.Q.. Two branch lines in Maine, one to Lewiston Maine and the other to Norway, Maine, split of the main Portland to Montreal line. Portland was the main winter port for rail traffic on the Grand Trunk System until the 1920s.  Portland was therefore a major grain exporting port, with two terminal grain elevators, each with a capacity of over one million bushels of grain. During the early 1920s, the Grand Trunk system ran into debt problems due to its Pacific extension and was nationalized by the Canadian government. It thus became part of the Canadian National Railways. However, the Grand Trunk New En...

A More Long Lasting Layout, Hopefully

While I have been working on a layout of some kind or another over the last few years, I have always had a difficult time staying with a certain layout for any length of time. This should be fairly obvious to anyone who reads this blog, as this is the fourth, I believe, layout idea or beginning that I have described on this blog. As far as I can tell, these projects have always been to big or to small, depending upon the layout, to remain engaging for any amount of time. For this reason, I have never gotten a layout to anything that remotely resembles a finished state. I think that my layout that lasted the longest lived for about four months and was mostly covered by a layer of basic ground foam in most areas. Even there, though, I did not even finish ballasting the track. I think that a large part of the problem with my previous layouts were that they were all, in their own way, too much. For example, the first layout concept I described here was supposed to include a paper mill, a...