Posts

Showing posts with the label Workbench

Scratchbuilding a Potato House - Part 5

Image
On Monday afternoon, I finished the potato house. There wasn't much work left to do on it after what I described in part 4 of this series, and it only took about two hours of work to finish off the potato house. I would have finished it Sunday evening, in fact, but the Patriots were playing in the Super Bowl, so that was more of a priority than model railroading for me. At any rate, all that was left to do was to paint the roof and weather the structure, and neither of those things took very long. The roof was simply painted with black acrylic paint, which covered fairly well, or at least well enough so that I did not have to add a second coat of paint. I then weathered the entire structure. I did not do anything elaborate on this building, as it should look like it was well maintained and the site of a fairly prosperous business, rather than a pile of rotting wood on the verge of collapse. Too often, I think you see structures that modelers have weathered to such an extent that it...

Scratchbuilding a Potato House - Part 4

Image
Progress on the potato house has been fairly slow over the last week, but I've been able to get a lot of work done on it this weekend. Since the last post on this subject, I have painted the walls, windows, doors, and concrete supports, glued on two different sets of roof panels, added details, and applied masking tape to the roof of the potato house in order to represent tar paper roofing. Most of this work was done over this most recent weekend, but the potato house was painted over the week. Quite a bit of progress, especially on painting, was made in fifteen to twenty minute intervals before dinner on weeknights. I managed to paint the entire structure in these short periods of time over the span of a week, painting one or two walls each night. The structure was painted light gray. According to the only prototype photo that I know of, at least part of the potato house was painted light gray. On the other part of the structure, the paint was worn off, so I assumed that the ent...

Scratchbuilding a Potato House - Part 3

Image
More progress on the potato house this evening. I attached floors to the main part of the structure, cut and glued styrene strip to represent the large concrete blocks that supported the prototype structure, and primed all the styrene parts of the structure with cheap gray craft paint. The next step will be to paint the entire structure with good quality paint. The walls will be painted grey and the freight doors painted dark green based on prototype photos. Floors were made out of .020 inch styrene sheet to allow the concrete piers to be attached to the structure. The floors also provide additional stability for the structure. Half of the concrete blocks attached to the floors. The blocks are roughly two scale feet high by eight scale inches wide. They are placed roughly six to seven scale feet apart. The rest of the concrete blocks attached. All of the styrene surfaces on the building were painted with some cheap gray craft paint that I had on hand. I just...

Scratchbuilding a Potato House - Part 2

Image
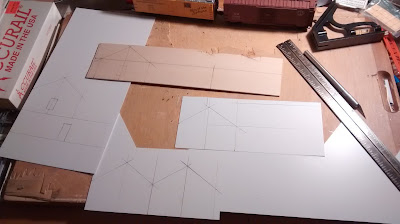
I got new X-Acto knife blades this afternoon, so the potato house project can move on. This evening, I got quite a bit more work done on the potato house. I cut and attached freight doors to the side walls, attached corner trim, assembled the two sections of the potato house, and attached them together to create the curve of the structure. Overall, progress on the structure went quite quickly, expcept for the door that I attached in the wrong place. The potato house will hold to forty foot boxcars and refrigerator cars when completed. While it is a fairly small structure,  potato houses were often fairly small structures, and the dimensions of the model I am building reasonably match the dimensions of the prototype, as far as I can tell. The freight doors were cut from some v-groove styrene sheet. The doors are three by two centimeters, which works out to be roughly eight by five scale feet. The door runners (?) at the top are made of scale lumber that I cut from clapboard...

Scratchbuilding a Potato House - Pt. 1

Image
While I haven't been particularly active in terms of model railroading so far this month, mostly because I have been unable to settle on a plan and a particular prototype to model. Yesterday, however, I started working on scratchbuilding a model of a potato house. These structures were common through northern Maine, particularly in the county (Whenever I refer to the county, I am speaking of Aroostook County, in northern Maine. Aroostook County is commonly referred to as only "the county" in the part of Maine I am from). Potato houses were ubiquitous in towns located along the Bangor and Aroostook railroad in the county up throuh the 1970s, and I have been looking at building a small layout based on part of the Bangor and Aroostook. Thus, I need to have models of at least one, if not more, potato house for a Bangor and Aroostook layout to look credible. I decided to scratchbuild my model based on a prototype potato house located in Houlton, Maine. This potato house wa...

Switchstands

Image
Sorry that I haven't been posting much regularly, but I' ve been really busy with other, non-model railroading, things. In fact, I haven't even managed to post wordless wednesdays on time.  This evening, though, I was finally able to get some modeling done. This evening, I assembled and painted two switchstand kits. These switchstand kits are made by Osborn Scale Models, and are laser cut wood and wire. The kit was fairly easy to assemble. I won't give an extensive written account of this - rather, the pictures will tell the story. My workbench at the start of the evening, with all the kit parts laid out and ready for assembly to begin. The switchstand bases after having holes for the posts drilled. The base on the right was rendered unusable by a drilling error on my part. Bases, posts, and a few other small pieces assembled.  The entire switchstand assembled but not yet painted. The posts were provided much longer than neccesary, so I c...

Building a Shed for Mattawamkeag

Image
Sunday evening, I said that I would post more details about the construction of the shed. I didn't get around to that yesterday, so here it is. The shed followed my usual construction methods, for the most part. I started constructing the shed by cutting out walls from Mt. Albert Scale Lumber scribed wood sheet. I used the .060 width between scribes for this project. Htis type of siding is a pretty close match to the prototupe shed, appearence wise. I then assembled the walls, using 6 by 6 inch scale lumber for trim. To construct the doors to the shed, I glued scale 1 by 8 lumber board by board to the shed wall. Since it is meant to represent two doors, I differentiated the doors by building one on a slight angle, as if it was falling of of its hinges. It turned out that one door had to be 5 boards wide and one door had to be 6 boards wide. This happened because I initially thought I had, and measured and planned for, 6 inch wide boards rather than 8 inch wide boards. I decided...

Candian Pacific # 241039-Improving an Old Athearn Car

Image
This morning, I decided to improve an old Athearn boxcar that I had acquired a few years ago. The car was an old blue box kit, and had okay basic details. It was painted and lettered for Canadian Pacific, so I had extra incentive to improve it. Also helping the car's case was the fact that it had the right number for the series of CP boxcar that it most closely represented. As my next layout will depict the section of the  Canadian Pacific transcontinental mainline which ran on the joint track with the Maine Cantral for 56 miles between Mattawamkeag and Vanceboro, I need all the CP cars I can find. I decided that in the case of this car, which isn't badly detailed but is not as well detailed as my other cars, I could use the car on CP mainline through freights only, so ttje lack of some details wouldn't be a problem. The main problem with this car was the bad weathering job that I had done on it. This car was the first car I that I ever weathered, and it was very obviou...

Stabilizing an Accurail Refrigerator Car

Image
Though the title specifies that the following applies only to accurail refrigerator cars, it also applies to accurail outside braced wood boxcars. In fact, I have used the following methods with success on Accurail outside braced wood boxcars. My Accurail Bangor & Aroostook refrigerator car had a very distinct tilt to one side when placed on the track. This tilt was very unsightly, and also made the car liable to tip over during operation. So this evening, I decided to do something about it. I placed the car on my workbench and looked at the underframe to try to determine what exactly the problem was. I first checked to see if it was a case of the entire underframe assembly not being properly attached to the rest of the car. I have had this problem with a few other Accurail cars, and the solution to this is to simply push the underframe into the car until there is a click. Sadly, this was not the case with this car. At first, I thought that the problem with this car was w...

Maine Central #3852

Image
This afternoon, I assembled Maine Central #3852, an accurail two bay hopper kit that I purchased at Mainline Hobby Supply in Blue Ridge Summit, Pennsylvannia. This is a very nice kit and built into a very nice car. It was a nice, quick, afternoon project after a long, slow, day at school. For the most part, I followed the instructions to the kit and did not make any modifications to the car. However, in the course of assembling the kit, I made several changes to the order in which I assembled the kit. I will note those modifications here, mostly for my own regrence if I ever build another model from this specific kit. First, when adding the coupler and coupler pockets to the car, add them before  adding the air resevoir. It makes screwing the couplers into place much easier. Second, glue the support post to the main body before adding the end assemblies with the couplers and such. Finally, screw the screws for the trucks all the way down the holes in the bolsters before att...

On My Workbench-9/14/16

Image
Over the past few days, I have been working on scratchbuilding a model of a house located next to the tracks in Mattawamkeag Maine. This project is coming along nicely. Last night I cut out all the walls for the house, as well as the window and door openings. I used clapboard wood siding from Mt. Albert Scale Lumber for the walls. This evening I am planning to install the windows in the walls and hopefully get the walls assembled. I will not be able to finish the house yet as I am nearly out of some neccesary materials. I took this picture after I had finished measuring out the walls for the house. This is how my workbench looks right now. Note the four walls that have been cut out and have had window and door openings cut into them.

Cutting Lumber Out of Wood Sheet

Image
While cutting the walls of my model of the Mattawamkeag, Maine, freight house from scale clapboard siding wood sheet, I found that I had a number of odd shaped pieces of wood sheet left over. I thought that this wood sheet could beut to use by cutting it into scale lumber. To do this, I cut along the clapboard pieces that are molded into the wood sheet. If you cut slowly and lightly with a sharp #11 blade, you can follow the line quite easily. Once cut, these pieces are roughly a scale 6 by 6 inches, although this would vary depending on what sized soding was used. I think the final results of this look fairly good. It is not the most efficient method to obtain scale lumber, but with the closest train store to me bieng nearly two hours drive, it will be a good way to obtain scale lumber in a pinch. Before: A rather useless piece of clapboard sheet. After: A pile of useful scale lumber.