Posts
Showing posts from September, 2016
Building a Shed for Mattawamkeag
- Get link
- X
- Other Apps
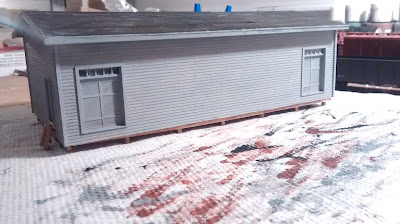
Sunday evening, I said that I would post more details about the construction of the shed. I didn't get around to that yesterday, so here it is. The shed followed my usual construction methods, for the most part. I started constructing the shed by cutting out walls from Mt. Albert Scale Lumber scribed wood sheet. I used the .060 width between scribes for this project. Htis type of siding is a pretty close match to the prototupe shed, appearence wise. I then assembled the walls, using 6 by 6 inch scale lumber for trim. To construct the doors to the shed, I glued scale 1 by 8 lumber board by board to the shed wall. Since it is meant to represent two doors, I differentiated the doors by building one on a slight angle, as if it was falling of of its hinges. It turned out that one door had to be 5 boards wide and one door had to be 6 boards wide. This happened because I initially thought I had, and measured and planned for, 6 inch wide boards rather than 8 inch wide boards. I decided...
Shed at Mattawamkeag
- Get link
- X
- Other Apps
This weekend, I scratchbuilt a small shed following a prototype structure located by the tracks in Mattawamkeag. I found the shed on Google Streetview, and figured out the dimensions from aerial photos. The shed was scracthbuilt from scribed wood sheet. I do not know who owned the shed during the 1950s, but it was either the nearby lumber mill or the Canadian Pacific, as the structure is definitely not of Maine Central origin. I will post more about how I built this structure tomorrow, I think. Looking at the front of the shed. Looking at the rear of the shed.
Candian Pacific # 241039-Improving an Old Athearn Car
- Get link
- X
- Other Apps
This morning, I decided to improve an old Athearn boxcar that I had acquired a few years ago. The car was an old blue box kit, and had okay basic details. It was painted and lettered for Canadian Pacific, so I had extra incentive to improve it. Also helping the car's case was the fact that it had the right number for the series of CP boxcar that it most closely represented. As my next layout will depict the section of the Canadian Pacific transcontinental mainline which ran on the joint track with the Maine Cantral for 56 miles between Mattawamkeag and Vanceboro, I need all the CP cars I can find. I decided that in the case of this car, which isn't badly detailed but is not as well detailed as my other cars, I could use the car on CP mainline through freights only, so ttje lack of some details wouldn't be a problem. The main problem with this car was the bad weathering job that I had done on it. This car was the first car I that I ever weathered, and it was very obviou...
Stabilizing an Accurail Refrigerator Car
- Get link
- X
- Other Apps
Though the title specifies that the following applies only to accurail refrigerator cars, it also applies to accurail outside braced wood boxcars. In fact, I have used the following methods with success on Accurail outside braced wood boxcars. My Accurail Bangor & Aroostook refrigerator car had a very distinct tilt to one side when placed on the track. This tilt was very unsightly, and also made the car liable to tip over during operation. So this evening, I decided to do something about it. I placed the car on my workbench and looked at the underframe to try to determine what exactly the problem was. I first checked to see if it was a case of the entire underframe assembly not being properly attached to the rest of the car. I have had this problem with a few other Accurail cars, and the solution to this is to simply push the underframe into the car until there is a click. Sadly, this was not the case with this car. At first, I thought that the problem with this car was w...
Maine Central #3852
- Get link
- X
- Other Apps
This afternoon, I assembled Maine Central #3852, an accurail two bay hopper kit that I purchased at Mainline Hobby Supply in Blue Ridge Summit, Pennsylvannia. This is a very nice kit and built into a very nice car. It was a nice, quick, afternoon project after a long, slow, day at school. For the most part, I followed the instructions to the kit and did not make any modifications to the car. However, in the course of assembling the kit, I made several changes to the order in which I assembled the kit. I will note those modifications here, mostly for my own regrence if I ever build another model from this specific kit. First, when adding the coupler and coupler pockets to the car, add them before adding the air resevoir. It makes screwing the couplers into place much easier. Second, glue the support post to the main body before adding the end assemblies with the couplers and such. Finally, screw the screws for the trucks all the way down the holes in the bolsters before att...
House at Mattawamkeag-Finished
- Get link
- X
- Other Apps
Wednesday night, I finished my model of the house that will be located by the tracks in Mattawamkeag. For the most part, I have already documented the construction of this structure on the blog. All that I did last night was finishing the porch. I started the porch on Sunday, but did not get any work done until Wednesday. The porch was built almost entirely out of scale lumber. The frame for the porch and the support posts for the porch roof were all made out of 6 by 6 lumber. The roof trim was made out of scale 6 by 8s. The floorboards were constructed board by board out of scale 1 by 6 lumber. Inch thick scale lumber is very thin! After assembling the porch, I painted the frame and the posts white, and painted the floorboards grey. I then drybrushed black and brown paint on the floorboards to represent where people would walk across the floor to reach the door. The roof was built and painted to my usual method. I then did some light weathering on the whole house. ...
House at Mattawamkeag-More Progress
- Get link
- X
- Other Apps
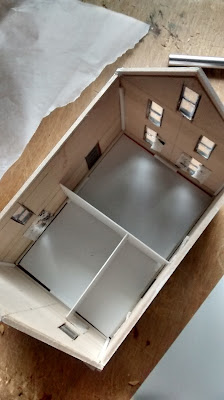
This evening, I continued working on the house that I have been scratchbuilding. This house will hopefully be located next to the freight house in Mattawamkeag on a future layout. I wanted to avoid an empty, unfinished, look to the house, so I took a number of steps to avoid this. I started this process by cutting a floor for the first story of the house from styrene. I then glued styrene walls into a plausible floorplan for the house onto the floor. This disposes of the problem of being able to see entirely through the structure when looking in through the windows. I then repeated this process for the second floor. On the second floor, agood deal of trimming had to be done to get all the floors and walls to sit in the structure. The second floor had to be trimmed at a 45 degree angle on the corners pf the floor, as the floor would otherwise not fit around the corner bracing for the house. In addition, the interior walls that I cut were to tall to match the roofline, so these ...
House at Mattawamkeag-Paint
- Get link
- X
- Other Apps
The most recent project that I have been working on is a model of a house in Mattawamkeag. This evening, I painted the walls of the building. The walls were painted white and the trim was painted black, which are typical colors for a house in Maine. The front and track sides pf the house. The front and rear sides of the house.
Wordless Wednesdays
- Get link
- X
- Other Apps
As it is now September and school has started, I no longer have as much time available for model railroading related activities, including this blog. With a large part of my time now taken up by school and homework, I have been unable to add as much to the blog as I would like. I have been able to work on a structure model that is coming along nicely, namely, the house that I breifly described in the last post. All this has caused me to look for a new way to keep posting fairly frequent. In order to accomplish this, I have decided to start posting a series of posts called Wordless Wednedays. The idea for this type of post originally came from George Dutka and his excellent White River Division blog. These posts will occur every Wednesday and will be, as the title suggests, wordless. They will contain one or more pictures, which should usually be related to my lauout or any ongoing model railroad related projects. These posts will not substitute for regular post...
On My Workbench-9/14/16
- Get link
- X
- Other Apps
Over the past few days, I have been working on scratchbuilding a model of a house located next to the tracks in Mattawamkeag Maine. This project is coming along nicely. Last night I cut out all the walls for the house, as well as the window and door openings. I used clapboard wood siding from Mt. Albert Scale Lumber for the walls. This evening I am planning to install the windows in the walls and hopefully get the walls assembled. I will not be able to finish the house yet as I am nearly out of some neccesary materials. I took this picture after I had finished measuring out the walls for the house. This is how my workbench looks right now. Note the four walls that have been cut out and have had window and door openings cut into them.
Modeling Maine Railroads- 50th Post
- Get link
- X
- Other Apps
After posting my recent post on the Mattawamkeag freight house, I realized that I had 49 posts on this blog. So I thought I would write a special post for the fiftieth post on the blog to describe some of what has been done recntly, as well as what I am planning to work on next. My recent projects have included building the Mattawamkeag freight house, as well as expanding and tweaking my freight car fleet. I have posted about both topics fairly extensively. I also recently built basic scenery on the countryside straight module on my layout. While I will do a post specifically about that soon, I thought that I would share a few views of the basic scenery here. Obviously, it's very basic and does not look much like Maine at the moment as there are no trees. However, I am pleased with how it is coming so far. This is a low level shot that I took that I think turned out pretty well. It's noce to have some semi finished scenery on the layout, both to look at and to t...
Mattawamkeag Freight House-More Photos
- Get link
- X
- Other Apps
I took a few more pictures of my Mattawamkeag freight house this afternoon. I thought that I should show it with a freight car so as to give a better idea of what size the building is. This gives a general view of the freight house with a boxcar spotted at the door. Another view of the track side of the freight house qith a boxcar spotted at the door. Looking down from roughly where the Mattawamkeag station platform would be located. I'm sorry for the poor quality of the photo- the lighting conditions that I took the photograph in were less than ideal.
Mattawamkeag Freight House
- Get link
- X
- Other Apps
Over Labor Day, I worked on scratchbuilding a model of the Maine Central Railroad's freight house in Mattawamkeag, Maine. Mattawamkeag is a remote rural town on the confluence of the Penobscot and Mattawamkeag rivers, and, more importantly, the junction of the main lines of the Maine Central Railroad and the Canadian Pacific Railroad. There was not much structure wise in Mattaeamkeag, and this freight house was one of the main railroad related structures in town. Since my next layout will depict Mattawamkeag, I thought that building the freight house would be a good project. The actual construction of the freight house is not that special. I used Northeastern Scale Models clapboard wood sheet for the walls, and scale lumber for the trim. I braced the structure with some peoces of styrene strip. The doors and windows are all from Tichy Train Group. Everything was glued together with a good amount of superglue. The building was supported by small woodwn stilts, instead of a regul...
Cutting Lumber Out of Wood Sheet
- Get link
- X
- Other Apps
While cutting the walls of my model of the Mattawamkeag, Maine, freight house from scale clapboard siding wood sheet, I found that I had a number of odd shaped pieces of wood sheet left over. I thought that this wood sheet could beut to use by cutting it into scale lumber. To do this, I cut along the clapboard pieces that are molded into the wood sheet. If you cut slowly and lightly with a sharp #11 blade, you can follow the line quite easily. Once cut, these pieces are roughly a scale 6 by 6 inches, although this would vary depending on what sized soding was used. I think the final results of this look fairly good. It is not the most efficient method to obtain scale lumber, but with the closest train store to me bieng nearly two hours drive, it will be a good way to obtain scale lumber in a pinch. Before: A rather useless piece of clapboard sheet. After: A pile of useful scale lumber.
On My Workbench-9/5/16
- Get link
- X
- Other Apps
I thought it might be interesting to post a picture of my workbench to show what projects I am currently working on. So here it is. As you can see, I have a large group of freight cars, all of which are Accurail kits. Two of the gondolas have been recently built, and a thord dondola is on mu workbench for purposes of photography. One boxcar is on the workbench for measuring purposes, while the composite boxcar is on the workbench for repairs. I don't quite know why the hopper is on the workbench. The two woood walls in front are my current project, a model of the Maine Central Railroad freight house at Mattawamkeag, Maine. I will post more about that project soon.
Maine Central Gondola #3267
- Get link
- X
- Other Apps
This evening a built another Accurail Maine Central gondola kit. This kit went together well and produced a nice looking model. Fortunately, this car came numbered differently from the gondola that I just built. I believe that they were two parts of a three car set. I purchased this kit at Maine Modelworks in Falmouth, Maine, just like the other one. This car still needs to be weathered at some point. A side view of the completed car. Roughly an end view of the car, showing the hand brake end. A three-quarters view of the car.
A Maine Central Snowplow
- Get link
- X
- Other Apps
I took out my Maine Central Snowplow this morning and photographed it on the layout. The snowplow is a Walthers Proto model that I got at Maine Modelworks in Falmouth, Maine, last year. The snowplow is an excellently detailed model and it also operates very well. The snowplow sitting on the layout. I edited the first photo to try to make the image more realistic.